May 19, 2010
How to Make Disco Ball in Photoshop
In this tutorial, I'm gonna be showing you on how to create Disco Ball in Photoshop.
This is just so quick and easy to do.
1. Create new File.
2. Add new Layer and name it CLOUDS.
3. Set Foreground color to White and Background to Black.
4. Go to Filter >>Render >>Clouds.
It should look like this:
5. Grab you Elliptical Marquee Tool and create a perfect circle by holding Shift and then Drag.
As shown below:
6. Now, go to Layer >>Layer via Copy or simply press Ctrl + J.
7. Hide/detele Layer CLOUDS and rename Layer1 to BALL.
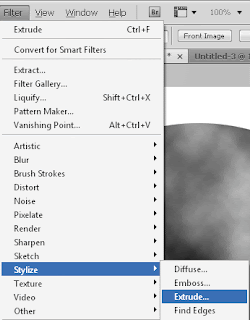
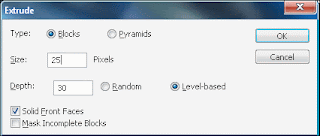
8. Go to Filter >>Stylize >>Extrude.
and use this settings:
and it’s should look like this:
9. Ctrl + Click Layer BALL to make selection.
The Selection should look like this:
10. Go to Filter >>Distort >>Spherize and set mode to Normal and 100% its Amount.
It should look like this:
11. Go to Image >>Adjustments >>Level and set this settings:
12. Open Hue and Saturation and then check Colorize. Choose the color you want.
Mine, I used this settings:
Here’s the result:
(Note: Use your Free Transform to make it look like in the picture below and fill your background layer with Black to give more emphasis to our DISCO BALL)
13. Let’s add Outer Glow to our DISCO BALL:
I used this color setting:
14. Now, let’s add more effects to our DISCO BALL.
We’ll then use the Glitter Effects click here to view the tutorial.
15. Let's do something with the background.
Add new layer and set brush to Hard Round 175px and the rest, play around with the Brush sizes and color to achieve this effect to its Background.
Add some Text to it.
16. And here's our final Result:
DOWNLOAD PSD FILE.
I hope you like it!
Enjoy!
Follow me on Twitter and Facebook.
Please SUBSCRIBE to my YouTube Channel for more update to my video tutorials.
God bless!
Labels:
disco ball in photoshop tutorial
Subscribe to:
Post Comments (Atom)
|
|


No comments:
Post a Comment